Tuesday 22 December 2009

Dog Soldiers Barn update

As part of the terrain for my Dog Soldiers project I've been building a barn. This is my first real scratch build so as is common it's been fun and educational. Built using balsa, cork tile (ala Matakishi's site) with lolly stick planking and (half done) cardboard tiling.


To be honest its a bit free-hand, but as the construct is meant to be an old barn I've generously let myself off. I went for a tiled roof over a corrugated iron one to allow for some future fantasy scenario use. I realise that using the cork tile as a base material could well be asking for warping trouble when the paint & sand go down, but I'll have to wait and see.


Out with the old, in with the new (Part 1)

 Well, it's getting perilously near the end of the year, and through all the chaos of the preparation of Christmas a wee glance back over my shoulder at the gaming year past and a gaze forward are always welcome distractions.

I'll start with the year past. On a different board somewhere at the start of 2009 I drummed out my marching orders for the year. I had decided to follow the example of a blogger on his quest of A Year of Frugal Gaming and try and concentrate on the piles of stuff I already had in my hobby shed.
The list went as follows:
This year I want to concentrate on a few long boiling projects without adopting any new ones (well I can dream)
Projects for 2009:
  1. Paint the THREE main characters for my RPG group - they've been sitting base coated and fleshed since last July for crying out loud!!
  2. Paint the 5 werewolves & create a farm house to play the Two Hour Wargames "Dog Soldiers" minigame.
  3. Start playing TwoHourWargames 5150 ruleset
  4. Create open ground terrain for play (Trees, bushes, etc)
  5. Create a modular dungeon terrain set.
  6. Create Necromunda style terrain with the bits of polystyrene & platformer build sets I already have.
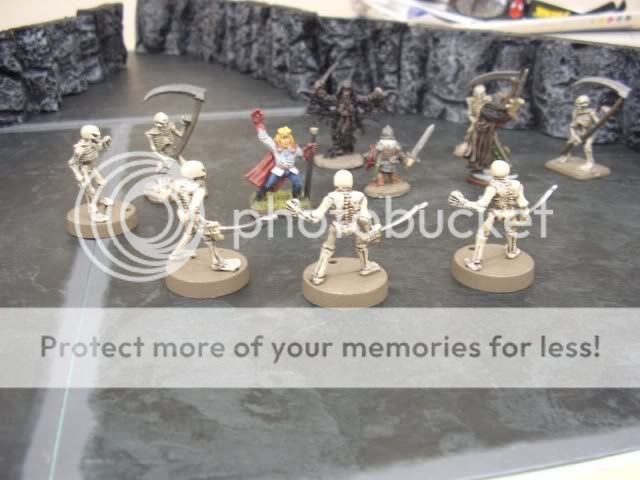
  7. Paint all the Heroquest style orcs, zombies, skeletons, etc for Heroquest and Dungeon crawls in 5. above.
  8. Build & paint the robot/terminator/necron force for battle
  9. Build tanks, etc to bulk up my Catachan force (not necessarily for 40k)
  10. Paint up an extra Necromunda gang or 2 (I already have one to touch up the battle scars so not too much effort here).

Funny how looking back at these reminds me of some of the bold visions of the future in Tomorrows World. Also how quickly plans and priorities change. Plans #3, 5, 7, 8, 9 & 10 just never happened. So much for sticking to my guns!

A lot of my time/enthusiasm was captured by my RPG group. I am currently Hosting/GMing the Warhammer Fantasy Roleplaying (1st Edition) classic "The Enemy Within" campaign. So I managed to get the PC group finished and painted a couple of other figures for a D&D game (tick pledge #1).

Scenery took up most of my time, as it turned out. Some outdoor trees (tick pledge #4) and some indoors fantasy decor to go with the "flexible" RPG room spaces constructed from box files. I also managed to cobble together so Sci-Fi terrain (tick pledge #6). The thing about generic terrain/scenics is that you never seem to have enough, so to have actually done some constitutes a victory in my books. No doubt more will be slowly forthcoming in the next year.  But I'm leaving that for part 2. Just to finish off my generic fantasy terrain list is a small town of cardstock buildings I'm constructing. They will feature in future posts without any doubt.

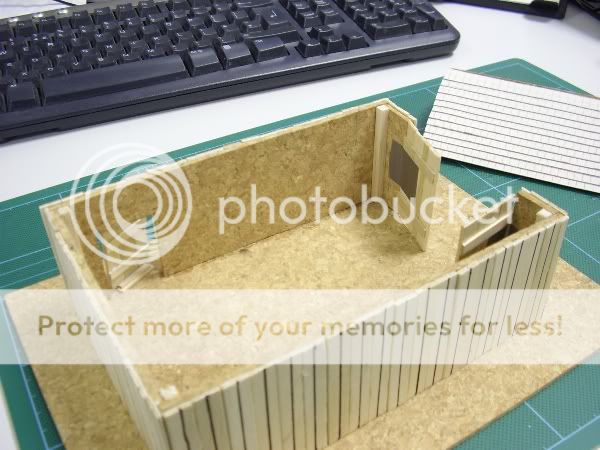
That just leaves my Dog Soldiers Project. I'm just going to miss the year end deadline here I fear. A box file based cottage has been made, and 5 werewolves have been painted. The barn/garage is in the process of construction (see next post) and the squaddies are undercoated. Do-able but most probably a January finish. The whole sheebang will be up here.

Next years pie-in-the-sky plans will be in part 2...

Wednesday 16 December 2009

Cavern Walls Project

*This is actually an old post from a different blog. Some TMP readers may have seen it before, but at least it gets my posts off to a start.

This is a quick description of my scenics project to use Juwel Aquarium scenics structured background to make some quick and easy cavern/tunnel walls for wargaming.

Juwel make a 3d plastic/foam background for aquariums. I picked up a sheet of their STR600 - a 60cm x 50 cm sheet from my local Pets-at-Home superstore. Unfortunately this product seems to be impossible to find over in the US .

Here are a couple pictures of the material before any work is done to them. (with a 28mm Foundry Gladiator for scale)


First I have to say that I had a few criteria I had to consider for this project.

  1. Value for money - my hobby budget is pretty limited, so I need to get something as cost effective and versitile as possible.
  2. Quick and easy - like my budget my hobby time is very limited (as is my skill!)
  3. Easy Storage - Very little room in the house means it must be flexible and easy.

The best looking way to create the tunnel system would be to construct some modular sections, but the design and construction time with the storage problem of this solution ruled this out. I decided to go with free standing walls and use something seperate as flooring.

The back of the sheeting (NB: only on the STR400 and STR600 versions) is split into one inch squares for ease of cutting to size. I chose to make my walls 2 inches high - tall enough to make it look the job but short enough to maximise the langth of wall I would finally have (8 metres in this case). The sheets are make of some sort of expanded foam on the inside and no too thick, so a couple of cuts with a sharp DIY knife easily cut through. I then cut the long wall lengths into random lengths (for variety and laziness), trying to only cut along the highest profile for joining finished walls later.(see pictures below for height example and wall depth profile)


To my joy I found that the walls were thick enough to happily stand on their own - so no need to attach to a base -BONUS!

Next task was a bit of painting. Using a small section of wall for testing I applied some cheap black spray as a base coat, hoping that the aerosol wouldn't eat the foam. Happily it didn't so I applied a black base coat and when dry and 2 dry brushed coats - first mid grey and the second a light gray. For the tunnel/cavern floor I bought some cheap slate effect vinyl floor tiles. They unfortunately have a light grey edging which I should do something with sometime, but they will do for now (and are extremely easy to store!). Below are a couple of pictures to give you the idea of what they turned out like.


Overall an easy product to use, and at £13 for 8m of ready sculpted cavern walling (plus an extra £10 for the 1m2 of tiles) pretty good as well.

Blog beginnings

Huzzah - another wargaming blog I hear you cry.

Well yes, I can't deny it (the evidence is (hopefully) being updated before your eyes. The more the merrier I say.

I thought I'd start one up and here I am unexpectedly faced with my first post only a couple of clicks into the creation process.

It is a blatent tool for focusing my gaming mind and hopefully providing a few moments of distraction for others. My painting skills I rank as average and the time I get to spend on my projects varies, so don't go expecting huge armies expertly painted in a couple of weeks. I feel, however, that I am in the same boat as a large number of gamers with a job, family and chores vying for time and attention.

In the end it's a case of enjoyment over perfection. Maybe one day I'll be able to bring the two closer together...