Tuesday 30 April 2013

Creating Hobbyshed Heights

For the first time in ages I'm hosting a game at the Arabian Towers Hobby Shed - a Chain Reaction/Reaction system demo/runthrough with view to starting play Two Hour Wargames 5150 - New Beginnings.

I've had some pieces of insulation foam sitting in the garage for years with view to making them into hills or something similar, so this was a good time to add some height to my sci-fi/urban scenery instead of relying on tall buildings alone.

Materials Used:
  • Foam insulation board
  • Fine sand
  • PVA
  • Black Acrylic paint (cheap craft store tube)
  • Grey Paint (DIY store tester pots)

The blocks are already in handy sized A4 chunks. I cut one block diagonally for some variety. Sealed the top and sides with watered down PVA and sprinkled fine sand on the tops to give some minor texture. The sand I've used is some groovy green childrens play sand that I picked up on clearance somewhere. The blocks will be stacked at times so I don't want any really chunky texturing on them that would leave large gaps or make for a wobbly surface.

After drying the blocks have now been given a coat in a watered down paint and PVA mix for more sealing and colour. This mix didn't give as good a colour coverage as I'd hoped so a layer of undiluted black acrylic was applied over the top (once dry).

Dry brush in grey, darker all over first and then a lighter shade. I think it is actually better to make the painting here a bit patchy so break it up. It's worth making sure the block edges get a good highlight so that they will stand out and stop the "flat ocean of grey" effect.

All done:


Saturday 27 April 2013

Urban War - Viridian Snipers

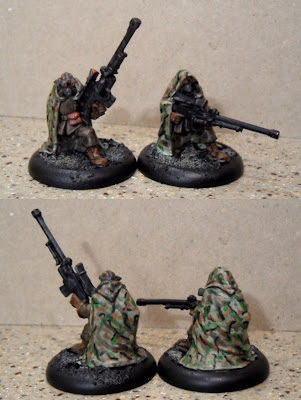
Here now are my camouflage delayed Viridian snipers:


The DPM hasn't been tried since my Dog Soldiers Squaddies (phew, 3 years ago!) and again I find myself half liking the outcome despite it looking close to the desired effect. I'm starting to believe that it's actually DPM I don't like. Oh well.

Thursday 25 April 2013

SoBH Campaign 3 - Battle 12

Weather: Thunderstorm
Scenario: Manhunt.
Defender: Barbarian

Forces:
New additions marked in purple italics

Dwarves (677 pts):
  • Valgen Maest: DWARF COMMANDER 103 Pts, XP: 1 , Quality 3+ Combat 4
    [Brain Damaged: Coward ],Short Move, Leader, Fearless, Free Disengage, Shieldwall, Snow Walk, Hatred (Barbarian), Forester
  • Falster Vonlyr: ELITE WARRIOR 65 Pts, XP: 1,  Quality 2+ Combat 4
    Short Move, Steadfast, Fearless, Free Disengage, Shieldwall, Snowwalk
  • Halgar Snowbeard: ELITE WARRIOR 50 Pts, XP: 1, Quality 3+ Combat 4
    Short Move, Opportunistic, Snow Walk, Shieldwall, Forester
  • Ireheart: ELITE WARRIOR 40 Pts XP: 1, Quality 3+ Combat 4
    Quality 3+, Combat 4, Short Move, Lethal (vs Barbarians), Snow Walk
  • Manon Hardfoot: WARRIOR 48 Pts, XP: 3, Quality 3+ Combat 4
    Short Move, Shieldwall, Snowwalk
  • Rod Grimiron: WARRIOR 48 Pts, XP: 2,  Quality 3+ Combat 4
    Short Move, Shieldwall, Snowwalk
  • Hono Pickbattler: WARRIOR 48 Pts, XP: 2,  Quality 3+ Combat 4
    Short Move, Shieldwall, Snowwalk
  • Harti Soreheid: WARRIOR 26 Pts, XP: 0, Quality 3+, Combat 3
    Short Move, Brewmaster
  • Scotti MacIrnbru: WARRIOR 24 Pts, XP: 0, Quality 3+, Combat 3
    Short Move
  • Geruk Foebreaker: SLAYER 30 Pts, XP: 0, Quality 3+, Combat 3
    Short Move, Hatred (Barbarians)
  • Cerri Crakshot: CROSSBOWMAN 38 Pts, XP: 0, Quality 3+, Combat 3
    Short Move, Medium Shooter, Snowwalk, Forester
  • Haggar Swiftbolt: ELITE CROSSBOWMAN 44 Pts, XP: 1 Quality 3+, Combat 3
    Short Move, Medium Shooter, Good Shot, Unerring Aim [Equipment: Ammunition]
  • Boindel Beaststrider: BEAR CAVALRY 68 Pts, XP 2 Quality 3+ Combat 4
    Mounted, Running Blow
Barbarians (568 pts):
  • Ardaric Blackmaul: BARBARIAN COMMANDER 90 Pts, XP: 2  Quality 2+, Combat 4
    Leader,  Fearless, Free Disengage, 
    [Equipment: Charmstone, Healing Potion]
  • Ooko: ELEMENTALIST 34 Pts (+ 75 Pts Summoning pool), XP: 2 Quality 2+, Combat 1
    Elementalist, Short Move, Acrobat [Equipment: Healing potion, spell scroll]
  • Erwig Bonetooth: ELITE ARCHER 72 Pts, XP: 2 Quality 3+, Combat 4
     Fearless, Shooter (Long), Forester,  Free Disengage [Equipment: Charmstone]
  • T-ord Keenbow: ARCHER 50 Pts, XP 1 Quality 3+, Combat 3
      Fearless, Shooter (Long), Free Disengage
  • Remos Arcfur: WARRIOR 52 Pts, XP: 1 Quality 3+ , Combat 4
     Fearless, Steadfast, Mounted
  • Rodulf Wolfhowl: WARRIOR 52 Pts, XP: 3 Quality 3+, Combat 4
     Fearless, Steadfast
  • Cohan Deathaxe: VETERAN WARRIOR 30 Pts XP: 1 Quality 4+, Combat 4
    Fearless, Short Move, Opportunistic
  • Garos Bearclaw: WARRIOR 36 Pts, XP: 3 Quality 3+, Combat 3,
    Fearless
  • Halka Skulldrinker: WARRIOR 36 Pts XP: 1 Quality 3+, Combat 3, 
    Fearless


Guest Star:
  • The Foul Beast: 
Setup:

The warbands gathered on opposite side of the table. At the end of turn one the Beast would appear at a random spot down the middle line of the table (and activate as player 3 from then on).

The Dwaves spent their first turn just staying still and waiting, as they sensed something evil was coming.

On the other side of the table the barbarians grouped behind a rocky outcrop as best they could and Ooko summoned a Fire Elemental. They all waited...

The Beast appeared. To everyone's relief it was down the far end on the table, so no immediate danger.

The Barbarian's moved to the far side of the rock, not sure how The Beast would move. Ooko summoned up more Fire and was picked up by Remos on his new horse in case a quick getaway was needed.

The Dwarves started to move, but found the goings slippy, with a whole group move going to ground.

Boindel led the way though, not waiting for his comrades in the mud. The Beast activated but did not move.


A disasterous start for the Barbarians saw Remos activate first with a snake eyes, going to ground, dropping Ooko and ending the turn.

The Dwarves were up and moving, heading towards the North pass, towards their foe but as far from The Beast as possible. The Beast started to move North, on the Dwarves starting side..

The Barbarians started to organise themselves to face the Dwarven direction. Ooko had a double fail, meaning another round with no additional Elemental support and Remos stuck at the back of the group.

The Dwarves turned the corner, with Boindel slipping, but far enough away to not matter. The Beast failed to activate.

Ooko managed to bolster the lines with another elemental, as the Barbarians continued to form.

Whilst the Dwarven front line formed.

And The Beast started at last to head toward the impending action.

The Barbarians moved towards the Dwarves with a few slips, the most vulnerable being the mounted Remos.

Boindel took advantage and charged towards the downed Barbarian, making contact with him but without attacking. A move and slip in the Dwarf lines ended the follow up early though.

Ooko tried a tranfix Boindel but failed to make the range. Rodulf moved into support Remos, who got up and attacked the Bear Cavalry, only pushing him back. T-ord tried to shoot the Bear but missed in the storm and slipped, ending the Barbarian turn.

With a roar the assembled dwarves move into virtual striking distance. Boindel charges into contact with Ardaric himself. The Beast fails to activate. Ooko tried a second transfix on Boindel and succeeds. Rudi and Garos move into outnumber the bear and Remos gallops in to kill him. The water elemental is dispatched to try and lure The Beast towards the Dwarves, but slips. A Fire Elemental spits a fire ball at Scotti,  but misses and slips in the process. Ardaric moves back behind his warriors for protection.

Valgen now comes up to give his warriors quality support. Cerri charges into Remos but the action is a stalemate. Hono then does the same, but the Horseman is only pushed back. Manon charges to attack Rodulf, with the barbarian being pushed back as well. The final Axe Brother Rod charges Rodulf, but finds himself knocked down at the barbarians feet.

The attention now turns towards the fallen elementals for victory points, but Snowbeard ends up on the ground with a double "1" and the turn ends, and the battle is called end of time as the Beast fails to activate again.

Result: A Barbarian win.


Tuesday 23 April 2013

Chain Reaction 3 - Final Version Trial

It's been a few years since I last played any Two Hour Wargames game. To be honest I'd stopped playing as they kept changing their core mechanic - the In Sight test, and I kept falling behind on rule revisons. But with the release of their free Chain Reaction 3  - Final Version there was a statement of intent that the mechanics were now finalised and future development was to be on genre, etc only.

Time to step back into the fold then and check out the new workings...

Arabiansquire and myself set up round a table at our local club. For simplicity we had small and similar squads:

AS (Space Marine figures):
  • Leader: Rep 5, Machine Pistol
  • Grunts x3: Rep 4, Assault Rifle
  • Heavy: Rep 4, Rocket Launcher
AK (Urban War Viridians):
  • Leader: Rep 5, Machine Pistol
  • Grunts x3: Rep 4, Assault Rifle
  • Heavy: Rep 4, Squad Automatic Weapon (aka S.A.W.)


We had a busy table, as the majority of weapons had a 48" range, which was pretty much the entire table. One of the good things about even these basic rules is that some of the solo play mechanics leak into the Head-to-Head. Right from the start the P.E.F. (Possible Enemy Forces) mechanic comes into play. Players secretly split their force into two or more groups and then use tokens to move around the table until the token come into sight. Decoy tokens are allowed and act as "false alarms". I like this "Fog of War" mechanic as I've never like the way we can see the opposite forces (heavy machine gun or leader for example) right from the off.

Enemy forces move and take position - or do they?


First squad resolution -  a 3 man squad (with Rocket Launcher) come onto a roof top...

spotted by a 2 man crew in another building (with S.A.W.)

Despite fire going between the buildings no-one was hit. The effect of the Rocket Launcher was still felt in the reaction tests as the Marines ducked back out of sight due to being outgunned.

A second group of marines moved to flank but were spotted. Another nice "real life" aspect of the reaction rules is that models can continue to move an extra 2" once spotted, giving the effect of a "fleeting glimpse" or delay whilst guns are levelled  Here it meant that the first member of the group activated the enemy, but only the rearguard was involved once the bullets started to fly.

Another change from the old rules is that every figure takes the insight reaction test at the same time and an order of reaction is established, although the stationary figure does still retain an advantage in deciding the order. Gun fire can quite often go back and forth for several shots before someone goes down or is beaten back into cover. In this case the Space Marine on the building top came off worse going "Out of Fight" (effectively dead for the purposes of a single battle)

With the reaction fire concluded, the flanking group then continued the rest of their activated movement round the corner.

Meanwhile the Marine S.A.W. was fairing less well against the Space Marine Missile Launcher. Despite firing off a few rounds at his opponent, the Marine soon found that when the Missile does hit, it's not a good thing!

We ran out of time for any other action, what with all the looking up of rules, etc. As with most rulesets, but especially Two Hour Wargames ones, they really do have to be played to see what they do. THW rules always seem very clunky with tonnes of table references, but in reality when the action starts flowing there are only two or three tables used, and the outcomes become known very quickly. there is still a bit of deciphering to be done on certain reaction effects (ducking back being one) but we'll get there.

To be played again...

Saturday 20 April 2013

Urban War - Viridian Heroes

Been painting the last of my Viridian ground troops. These two have finished first:


These are the Viridian Heroine Marine Sergeant and an old sculpt Marine Sergeant.

The Marine Sergeant is destined to be the model for my Viridian Commander, although I'll have to consult the stats, etc to decided who he will stand in for.

The original plan for the Heroine sergeant was to have her coat in DPM, but when I decided before starting the DPM painting that the folds in the coat looked to good and dynamic to muddy with the camouflage pattern. I have 2 final cloaked snipers who are in a similar painted position waiting for the camouflage to go on.

Monday 8 April 2013

Zombie Hunter Gang Finished

The last 2 members of the gang are done:

Daphne:

and Scooby:


The most difficult part of the whole gang was trying to get the colour of Daphne's dress. Didn't quite get it, but the close enough in this context.

And of course a group (or should that be gang) shot: